Recently received a project is to be a coffee machine, household requirements with a touch screen operation, the function is good, is above the screen selection may not be very good, fortunately, this project I can decide what MCU to use myself also can be used to decide what the screen, so I chose the STM32 of this kind of simple and easy MCU to use, display screen I chose STONE’s touch screen display, the screen is simple and easy to use, My STM32 MCU only through UART communication is ok with it.
STONE serial LCD display screen which can communicate through the serial port of MCU. At the same time, the logic design of the UI interface of this display screen can be designed directly by using the STONE TOOL Box provided by STONE’s official website, which is very convenient. So I’m going to use it for this coffee machine project.
At the same time, I will simply record the basic development. Since this is a project of my company, I will only record a simple demo and not write the complete code.
The website has a variety of information about the model, use, and design documentation, as well as video tutorials. I won’t go into too much detail here.
Coffee machine display screen function introduction
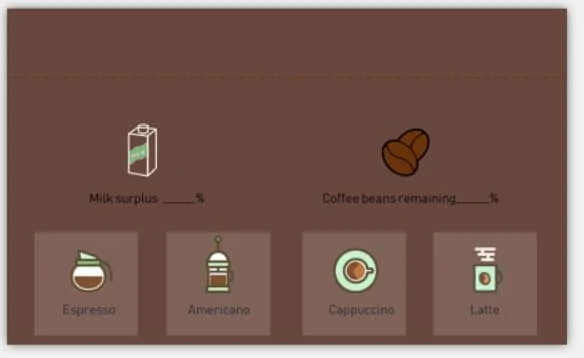
This project has the following functions:
Displays the current time and date
There are four buttons on the display for americano, latte, cappuccino and espresso.)
Displays the current amount of remaining coffee beans, milk, and coffee sugar
A text display box displays the current state
With these concepts in mind, you can design a UI interface. STONE of the touch screens in the UI design is relatively simple, the user through PhotoShop software design good UI interface and button effect, through the STONE TOOL Box to design good pictures into the screen, and add your own buttons with STONE TOOL Box logic and serial data the return value is ok, very easy for you to develop.
Make UI pictures for STONE display
According to functional requirements, I made the following two UI display interfaces, one is the main interface and the other is the button effect.


Use of STONE TOOL Box
Currently, STONE provides TOOL Box. Open this TOOL to create a new project, then import the designed UI to display pictures, and add your own buttons, text display boxes, etc.
The effects of adding buttons and displaying components in the STONE TOOL Box are as follows:

STONE TOOL Box has the function of simulation display, through which you can see the operation effect of UI interface:

At this point, my UI display is complete, and all I have to do is write the MCU code.
Download the files generated by the STONE TOOL Box onto the display screen to see the actual results.

STM32F103RCT6
STM32F103RCT6 MCU has powerful functions. Here are the basic parameters of the MCU:
Series: STM32F10X
Kernel: ARM – COTEX32
Speed: 72 MHZ
Communication interface: CAN, I2C, IrDA, LIN, SPI, UART/USART, USB
Peripheral equipment: DMA, motor control PWM, PDR, POR, PVD, PWM, temperature sensor, WDT
Program storage capacity: 256KB
Program memory type: FLASH
RAM capacity: 48K
Voltage – power supply (Vcc/Vdd) : 2 V ~ 3.6 V
Oscillator: internal
Operating temperature: -40°C ~ 85°C
Package/housing: 64-lqfp
In this project, I will use UART, GPIO, Watch Dog and Timer of STM32F103RCT6.
The development of these peripherals is documented below.
STM32 USES Keil MDK software development, which is no stranger to you, so I will not introduce the installation method of this software.
STM32 can be simulated online by j-link or st-link and other simulation tools. The following picture is the STM32 circuit board I used:

UART serial
STM32F103RCT6 has several serial ports. In this project, I used the serial port channel PA9/PA10, and the serial port baud rate was set at 115200.
GPIO
In the user interface of this project, there are a total of four buttons, which are actually the making of four kinds of coffee. In the coffee machine, controlling the number of coffee beans, milk consumption, and water flow of different coffees is actually realized by controlling sensors and relays, while I simply control the GPIO pin first.
void PAD_INIT(void)
{
GPIO_InitTypeDef GPIO_InitStructure;
RCC_APB2PeriphClockCmd(RCC_APB2Periph_GPIOB|RCC_APB2Periph_GPIOE, ENABLE); //ENABLE CLOCK
GPIO_InitStructure.GPIO_Pin = GPIO_Pin_0|GPIO_Pin_1|GPIO_Pin_2|GPIO_Pin_3; //–>PB config
GPIO_InitStructure.GPIO_Mode = GPIO_Mode_Out_PP; // PP OUT
GPIO_InitStructure.GPIO_Speed = GPIO_Speed_50MHz; //GPIO SPEED 50MHz
GPIO_Init(GPIOB, &GPIO_InitStructure);
GPIO_SetBits(GPIOB,GPIO_Pin_0|GPIO_Pin_1|GPIO_Pin_2|GPIO_Pin_3); //config out hight
Timer
When initializing the timer, specify the frequency division coefficient PSC, here is our system clock (72MHz) for frequency division
Then specify the reload value arr, which means that when our timer reaches this arr, the timer will reload other values.
For example, when we set the timer to count up, the value of the timer count is equal to arr and will be cleared by 0 and recalculated
The timer count is reloaded and once is an Update
Calculate the Update time formula Tout = ((arr+1)*(PSC +1))/Tclk
Formula derivation : Tclk is the clock source of timer, here is 72Mhz
We divide the allocated clock frequency, specify the frequency division value as PSC, then divide our Tclk into PSC +1, the final frequency of our timer is Tclk/(PSC +1) MHz
So what we mean by the frequency here is that we have 1s of Tclk over PSC +1 M Numbers (1M=10 ^ 6), and the time for each number is PSC +1 /Tclk, and it’s easy to understand that the inverse of the frequency is the period, and the period for each number here is PSC +1 /Tclk seconds and then we go from 0 to arr is (arr+1)*(PSC +1)/Tclk
For example, let’s set arr=7199 and PSC =9999
We divided 72MHz into 9999+1 is equal to 7200Hz
This is 9,000 counts per second, and each count is 1/7,200 of a second
So we’re recording 9,000 Numbers here to go to the timer update (7199+1)*(1/7200)=1s, so 1s goes to an update.
void TIM3_Int_Init(u16 arr,u16 psc)
WatchDog
To prevent the system from crashing while the program was running, I added the watchdog. In fact, all projects that use the MCU generally use a watchdog.
STM32 has two built-in watchdogs, providing greater security, time accuracy and flexibility. Two watchdog devices (independent watchdog and window watchdog) can be used to detect and resolve faults caused by software errors. When the counter reaches a given timeout value, an interrupt (window watchdog only) or system reset is triggered.
Independent watchdog (IWDG) :
Driven by a dedicated low-speed clock (LSI), it works even if the master clock fails.
It is suitable for use in situations where the watchdog is required to work completely independently outside the main program and requires low time accuracy. Window watchdog (WWDG) :
Driven by the clock from APB1 clock after frequency division. Detect abnormally late or premature application operation through a configurable time window. Suitable for programs that require watchdogs to function in precise timing Windows.
Finally, add the code in the timer interrupt:
In the timer interrupt, my goal is to check how much coffee and milk is left, and then send the detected value to the display screen through a serial port.
Measuring how much milk and coffee beans are leftover is usually done by sensors. Simple methods include pressure sensors, which measure the current weight of the milk and coffee beans to determine how much is left over.
Write in the last
This article only records the simple development process of my project. Considering the confidentiality of the company’s project, the UI display interface I used was also made by myself, not the real UI display interface of this project.
The code part of STM32 only adds the peripheral driver of MCU and related logic code. Also considering the confidentiality of the company’s project, the specific key technology part is not given, please understand. However, according to the code I provided, cooperate with the STONE display screen. my friends who are also software engineers need only spend a few days to add key technical parts to my code framework to complete the project.